Tuesday, June 10, 2008
I joined TWD!
I'm very excited to start baking along with all the great people of Tuesdays with Dorie. Check back next Tuesday for pics of the Peppermint Cream Puff Ring. And in the meantime, go buy the book that inspired this group... Baking: From My Home to Yours by Dorie Greenspan. It's a fabulous collection of every fantastic dessert and treat you will ever want to make. Yum!
I don't always eat dessert first
From the looks of my blog posts so far, you would think all I ever eat is dessert. That's not entirely true, although I never pass up a sweet treat before, during or after a meal. I do enjoy savory dishes as well though.
A few weekends ago, I spent an entire Sunday afternoon in the kitchen making fresh pasta dough and homemade ravioli. The recipe made enough for 2 meals for my husband and I, so I decided to freeze some so we could enjoy them again. I was very pleased with how they turned out and plan to make several more batches of various fillings to freeze. This made for a quick and delicious week night meal after a hectic day at work.
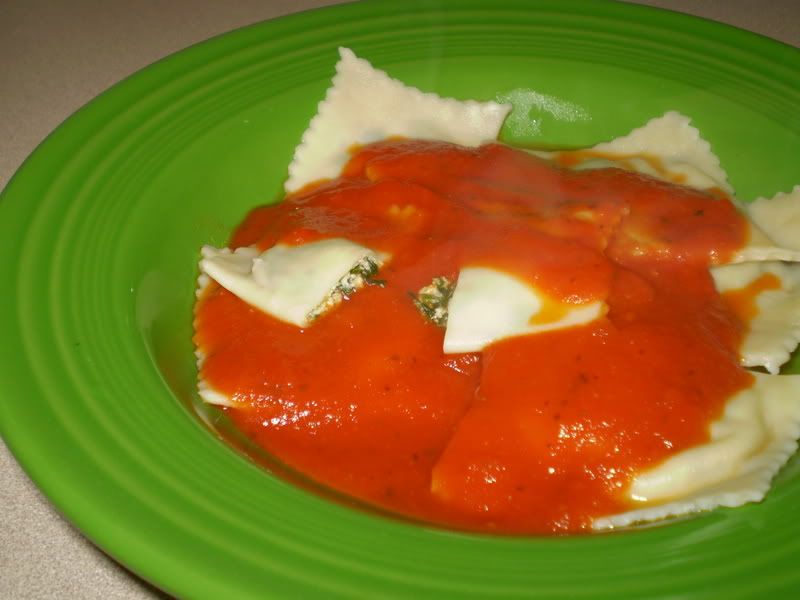
For this batch, I decided to make a spinach and artichoke filling. I basically adjusted a recipe that I use for spinach and artichoke dip and instead of cream cheese, I used ricotta. There was quite a bit of filling left over which I just baked in a small dish and used as a dip, but next time I will cut the recipe down a little for the filling, or make more pasta dough to fill.
Spinach and Artichoke Ravioli
For the dough:
2 and a 1/4 cups flour
3 eggs
Pour the flour out on a piece of parchment paper and make a well in the middle. Lightly beat the eggs and then pour them into the well in the flour. Slowly mix together and once the dough forms, knead it for about 5 minutes. Wrap in saran and put in the fridge to rest for 45 minutes. I used the pasta maker attachment on my Kitchen Aid to roll it out into sheets, but you could also just use a rolling pin. I made long sheets of pasta about the thickness of linguine noodles and about 4-5 inches wide. Fold the sheet in half lengthwise so you have a mark down the center and unfold again.
Put a tablespoon of the filling along one side of the pasta about 2 inches apart from each other. Fold the other side over the top and press together between the mounds of the filling. I used a pastry cutter to cut the ravioli out around the filling. Press the sides together just so they are firmly stuck and wouldn't pop open when boiled.
For the filling:
1 cup chopped frozen spinach, drained of water
4-5 artichoke pieces (I used the jarred kind that is in olive oil)
1 small tub of ricotta cheese
1/2 cup shredded mozzarella cheese
1/2 cup freshly grated parmesan cheese
1/2 teaspoon black pepper
1 teaspoon garlic salt
1 large clove of garlic
Put the garlic, spinach and artichoke in a food processor and chop to a fine mince. Transfer to a medium sized bowl and mix in all other ingredients. Fill the ravioli dough with the mixture.
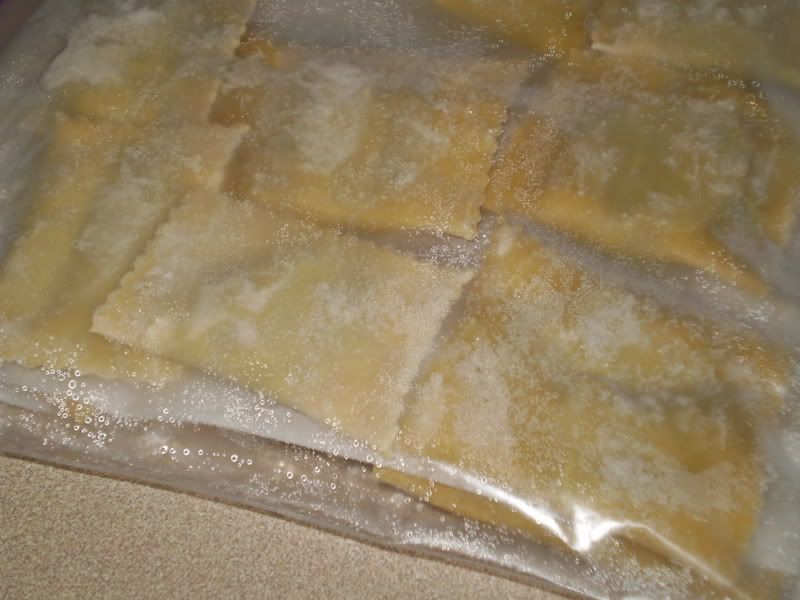
To freeze, place ravioli flat one by one in a ziplock bag and put a piece of parchment in between the layers (I put two layers in each bag) so they won’t stick together. Place the bags flat in the freezer. Not sure how long they will keep, but I used a bag 2 weeks after freezing and they were perfectly fine.
If cooking fresh, boil in lightly salted water for 7-9 minutes until al dente. If cooking after freezing, thaw for about 20 minutes before boiling as above. Top with your favorite marinara sauce.
From the freezer.
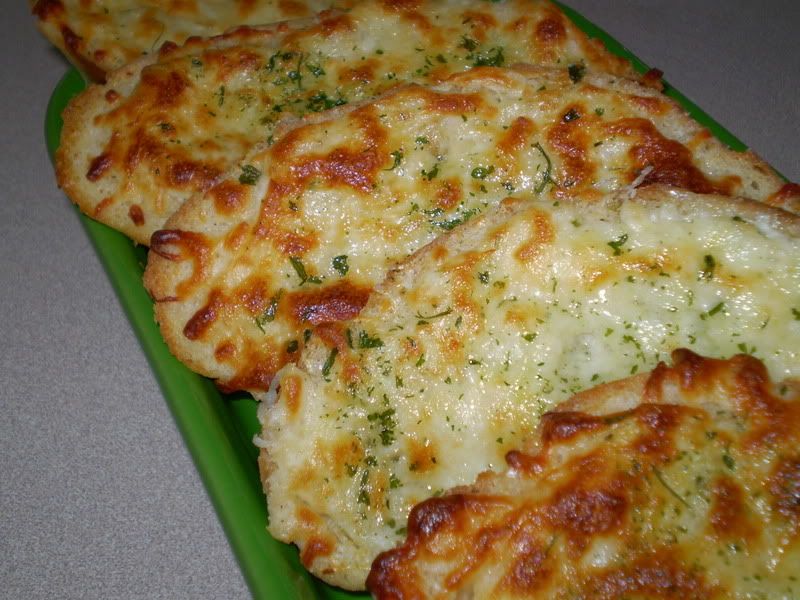
Garlic Bread with cheese
5 large slices of crusty bread
4 tablespoons of butter, softened to room temperature (or softened in the microwave in a bowl for 20 seconds)
½ teaspoon garlic salt (I like Lawry’s Garlic Salt)
1 cup shredded mozzarella cheese
¼ cup fresh grated parmesan cheese
1 tablespoon dried parsley
Mix garlic salt with butter and spread evenly on bread slices. Top with cheeses and sprinkle with parsley, and bake on 400 degrees for 6-8 minutes until cheese is melted and golden.
A few weekends ago, I spent an entire Sunday afternoon in the kitchen making fresh pasta dough and homemade ravioli. The recipe made enough for 2 meals for my husband and I, so I decided to freeze some so we could enjoy them again. I was very pleased with how they turned out and plan to make several more batches of various fillings to freeze. This made for a quick and delicious week night meal after a hectic day at work.
For this batch, I decided to make a spinach and artichoke filling. I basically adjusted a recipe that I use for spinach and artichoke dip and instead of cream cheese, I used ricotta. There was quite a bit of filling left over which I just baked in a small dish and used as a dip, but next time I will cut the recipe down a little for the filling, or make more pasta dough to fill.
Spinach and Artichoke Ravioli
For the dough:
2 and a 1/4 cups flour
3 eggs
Pour the flour out on a piece of parchment paper and make a well in the middle. Lightly beat the eggs and then pour them into the well in the flour. Slowly mix together and once the dough forms, knead it for about 5 minutes. Wrap in saran and put in the fridge to rest for 45 minutes. I used the pasta maker attachment on my Kitchen Aid to roll it out into sheets, but you could also just use a rolling pin. I made long sheets of pasta about the thickness of linguine noodles and about 4-5 inches wide. Fold the sheet in half lengthwise so you have a mark down the center and unfold again.
Put a tablespoon of the filling along one side of the pasta about 2 inches apart from each other. Fold the other side over the top and press together between the mounds of the filling. I used a pastry cutter to cut the ravioli out around the filling. Press the sides together just so they are firmly stuck and wouldn't pop open when boiled.
For the filling:
1 cup chopped frozen spinach, drained of water
4-5 artichoke pieces (I used the jarred kind that is in olive oil)
1 small tub of ricotta cheese
1/2 cup shredded mozzarella cheese
1/2 cup freshly grated parmesan cheese
1/2 teaspoon black pepper
1 teaspoon garlic salt
1 large clove of garlic
Put the garlic, spinach and artichoke in a food processor and chop to a fine mince. Transfer to a medium sized bowl and mix in all other ingredients. Fill the ravioli dough with the mixture.
To freeze, place ravioli flat one by one in a ziplock bag and put a piece of parchment in between the layers (I put two layers in each bag) so they won’t stick together. Place the bags flat in the freezer. Not sure how long they will keep, but I used a bag 2 weeks after freezing and they were perfectly fine.
If cooking fresh, boil in lightly salted water for 7-9 minutes until al dente. If cooking after freezing, thaw for about 20 minutes before boiling as above. Top with your favorite marinara sauce.
From the freezer.
Garlic Bread with cheese
5 large slices of crusty bread
4 tablespoons of butter, softened to room temperature (or softened in the microwave in a bowl for 20 seconds)
½ teaspoon garlic salt (I like Lawry’s Garlic Salt)
1 cup shredded mozzarella cheese
¼ cup fresh grated parmesan cheese
1 tablespoon dried parsley
Mix garlic salt with butter and spread evenly on bread slices. Top with cheeses and sprinkle with parsley, and bake on 400 degrees for 6-8 minutes until cheese is melted and golden.
Monday, June 9, 2008
Perfect it is!

I have several great food blogs bookmarked and I check them daily for new and exciting recipes to try. After a while, I kept seeing these posts in many of the blogs mostly titled TWD and followed by a great dessert that just looked too good to even eat. I investigated a little further and found out that TWD stands for Tuesdays with Dorie , and it's this wonderful group of food bloggers that pick one recipe a week from the book Baking: From My Home to Yours by Dorie Greenspan, and they update their blogs each Tuesday to showcase their latest creation.
One recipe kept catching my eye. It's called Perfect Party Cake and it looked delicious. I finally found an excuse to make it when my husband and I had a few friends over on Saturday night for a BBQ and some Rock Band and Balderdash hilarity. The unanimous verdict was that the cake was indeed, perfect!
Perfect Party Cake (Baking: From My Home to Yours by Dorie Greenspan)
For the Cake:
2¼ cups (9 ounces) cake flour
1 tablespoon baking powder
½ teaspoon salt
1¼ cups whole milk or buttermilk
4 large egg whites
1½ cups (10½ ounces) sugar
2 teaspoons grated lemon zest
1 stick (8 tablespoons or 4 ounces) unsalted butter, at room temperature
½ teaspoon pure lemon extract
For the Buttercream:
1 cup sugar
4 large egg whites
3 sticks (12 ounces) unsalted butter, at room temperature
¼ cup fresh lemon juice (from 2 large lemons)
1 teaspoon pure vanilla extract
For Finishing:
2/3 cup seedless raspberry preserves stirred vigorously or warmed gently until spreadable
About 1½ cups sweetened shredded coconut (I omitted this)
Getting Ready:
Center a rack in the oven and preheat the oven to 350 degrees F. Butter two 9 x 2 inch round cake pans and line the bottom of each pan with a round of buttered parchment or wax paper. Put the pans on a baking sheet.
To Make the Cake:
Sift together the flour, baking powder and salt.
Whisk together the milk and egg whites in a medium bowl.
Put the sugar and lemon zest in a mixer bowl or another large bowl and rub them together with your fingers until the sugar is moist and fragrant. Add the butter and working with the paddle or whisk attachment, or with a hand mixer, beat at medium speed for a full 3 minutes, until the butter and sugar are very light. Beat in the extract, then add one third of the flour mixture, still beating on medium speed. Beat in half of the milk-egg mixture, then beat in half of the remaining dry ingredients until incorporated. Add the rest of the milk and eggs beating until the batter is homogeneous, then add the last of the dry ingredients. Finally, give the batter a good 2- minute beating to ensure that it is thoroughly mixed and well aerated.
Divide the batter between the two pans and smooth the tops with a rubber spatula. Bake for 30-35 minutes, or until the cakes are well risen and springy to the touch - a thin knife inserted into the centers should come out clean. Transfer the cakes to cooling racks and cool for about 5 minutes, then run a knife around the sides of the cakes, unfold them and peel off the paper liners. Invert and cool to room temperature, right side up (the cooled cake layers can be wrapped airtight and stored at room temperature overnight or frozen for up to two months).
To Make the Buttercream:
Put the sugar and egg whites in a mixer bowl or another large heatproof bowl, fit the bowl over a plan of simmering water and whisk constantly, keeping the mixture over the heat, until it feels hot to the touch, about 3 minutes. The sugar should be dissolved, and the mixture will look like shiny marshmallow cream. Remove the bowl from the heat. Working with the whisk attachment or with a hand mixer, beat the meringue on medium speed until it is cool, about 5 minutes.
Switch to the paddle attachment if you have one, and add the butter a stick at a time, beating until smooth. Once all the butter is in, beat in the buttercream on medium-high speed until it is thick and very smooth, 6-10 minutes. During this time the buttercream may curdle or separate - just keep beating and it will come together again. On medium speed, gradually beat in the lemon juice, waiting until each addition is absorbed before adding more, and then the vanilla. You should have a shiny smooth, velvety, pristine white buttercream. Press a piece of plastic against the surface of the buttercream and set aside briefly.
To Assemble the Cake:
Using a sharp serrated knife and a gentle sawing motion, slice each layer horizontally in half. Put one layer cut side up on a cardboard cake round or a cake plate protected by strips of wax or parchment paper. Spread it with one third of the preserves. Cover the jam evenly with about one quarter of the buttercream. Top with another layer, spread with preserves and buttercream and then do the same with a third layer (you’ll have used all the jam and have buttercream leftover). Place the last layer cut side down on top of the cake and use the remaining buttercream to frost the sides and top. Press the coconut into the frosting, patting it gently all over the sides and top. (I read in someone's blog, sorry I don't remember whose, that it was easier to put the buttercream on the cake layer first and then top with the perserves. I did this and it worked out very well.)
Serving:
The cake is ready to serve as soon as it is assembled, but I think it’s best to let it sit and set for a couple of hours in a cool room - not the refrigerator. Whether you wait or slice and enjoy it immediately, the cake should be served at room temperature; it loses all its subtlety when it’s cold. Depending on your audience you can serve the cake with just about anything from milk to sweet or bubbly wine.

Friday, June 6, 2008
Everybody's doing it
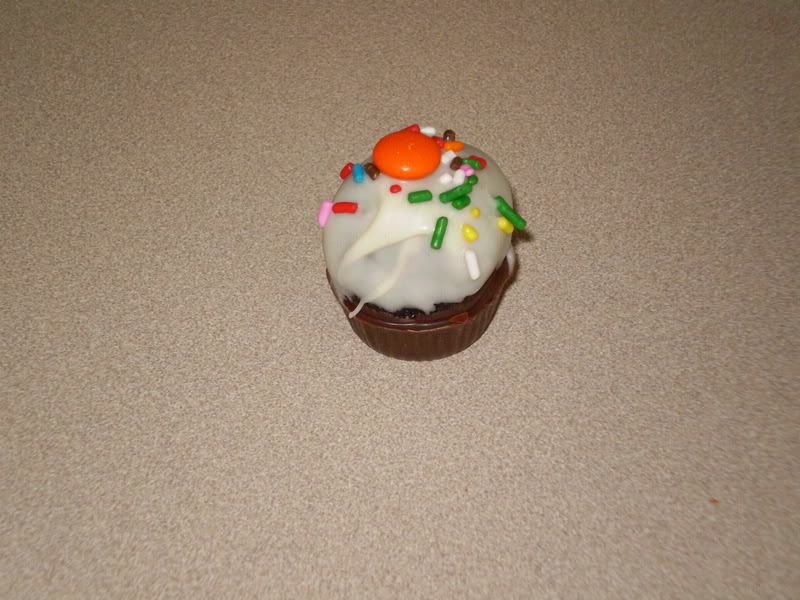
I was searching the internet for food blogs one day and came across a most fabulous site, Bakerella. Looking through the Bakerella site, I saw a post for cake balls that looked pretty interesting. So I bookmarked it and thought, maybe one day I will make those, they look yummy! A few weeks passed and I looked at the site again and Bakerella had updated with a new post about the cake balls, only this time she was calling them Cupcake Bites and had shaped them to look like little miniature cupcakes. Now they were just too cute to ignore, so I immediately ran out to buy the simple ingredients and bake away.
Using the back of a large spoon, mix thoroughly with 1 can frosting. It may be easier to use fingers to mix together, but be warned it will get messy. (It is easier to use your hands, but it's VERY messy.)
Roll mixture into quarter size balls, make sure they are smaller in diameter than that of your candy mold, and lay on wax paper covered cookie sheet.
Chill in the freezer for a few minutes, until they are slightly firm, not frozen.
Melt chocolate bark and candy melts in microwave per directions on package. (I melt the candy melts in a nonstick pot right on the stove top on a very low heat setting and stir continuously so it doesn't burn.)
Using a spoon or squeeze bottle, fill each mold cavity with a small amount of chocolate. Sorry, I didn't think to measure how much. But as soon as you fill the cavity, go ahead and place one of your rolled balls into it. Carefully push it down until the force causes the chocolate to push up and fill in around the sides of the ball. You may have to experiment with a couple to get the right amount. Stop pushing once the chocolate reaches the top edge.
Place the mold tray filled with cupcakes in the freezer for just a few minutes to let the chocolate set. Remove and then gently pull up on the cake ball top to release from candy mold.
Decorate.
Here's a like to Bakerella's post and much cuter Cupcake Bites.
Bakerella was even on the Martha Stewart Show making these adorable little treats and they are now popping up on food blogs everywhere. They are super easy to make and fun to decorate, but they are a little time intensive. Depending on how large you make them, you can easily get around 45 bites out of this recipe. So don't do like I did the first time I made them and think...hey, if one type of cake is good, then two is even better! I was buried in cake balls up to my chin!
Cupcake Bites (from Bakerella - my notes are added in parentheses)
Ingredients:
1 box cake mix cooked as directed on box for 13 X 9 cake (I like chocolate fudge, but Bakerella has made red velvet that is really good too)
1 can frosting 16 oz. (Match the flavor to compliment your cake, with chocolate fudge I like chocolate frosting, but with red velvet the cream cheese frosting is great)
1 package chocolate bark or candy melts for cupcake bottom
Colored Candy Melts for cupcake top
Candy Cup Mold (I bought the peanut butter cup shaped mold at a craft store)
Sprinkles and m&ms for decoration
Directions:
After cake is cooked and cooled completely, crumble into large bowl. The texture should be fine/fluffy.
Using the back of a large spoon, mix thoroughly with 1 can frosting. It may be easier to use fingers to mix together, but be warned it will get messy. (It is easier to use your hands, but it's VERY messy.)
Roll mixture into quarter size balls, make sure they are smaller in diameter than that of your candy mold, and lay on wax paper covered cookie sheet.
Chill in the freezer for a few minutes, until they are slightly firm, not frozen.
Melt chocolate bark and candy melts in microwave per directions on package. (I melt the candy melts in a nonstick pot right on the stove top on a very low heat setting and stir continuously so it doesn't burn.)
Using a spoon or squeeze bottle, fill each mold cavity with a small amount of chocolate. Sorry, I didn't think to measure how much. But as soon as you fill the cavity, go ahead and place one of your rolled balls into it. Carefully push it down until the force causes the chocolate to push up and fill in around the sides of the ball. You may have to experiment with a couple to get the right amount. Stop pushing once the chocolate reaches the top edge.
Place the mold tray filled with cupcakes in the freezer for just a few minutes to let the chocolate set. Remove and then gently pull up on the cake ball top to release from candy mold.
Now, holding the bottom of the cupcake, dip the top in another color of melted chocolate.
Decorate.
Here's a like to Bakerella's post and much cuter Cupcake Bites.
Cookie Monster

I don't mean to brag or anything, but I make the best.chocolate.chip.cookies.ever! I cannot at all take credit for creating the recipe, but I can take credit for trying an absolute ton of different recipes until I found the perfect one. That was a hard job I must admit. ;)
I love, with all my heart and soul, Ghirardelli chocolate. It's the only chocolate I like to use when baking. So, when I saw this recipe on the back of the Ghirardelli chocolate chip bag, I just had to try it. It's heavenly! Pure, unadulterated bliss in cookie form! Especially with my "secret ingredient" added in for good measure.
The Ultimate Chocolate Chip Cookie (from Ghirardelli - Yield 4 dozen)
Ingredients:
2 1/4 cups unsifted flour
1 teaspoon baking soda
1/2 teaspoon teaspoon salt
1 cup (2 sticks) butter, room temperature
3/4 cup sugar
3/4 cup packed brown sugar
2 eggs
2 teaspoons vanilla
2 cups Ghirardelli milk chocolate chips (I prefer milk chocolate over semi or bittersweet, but you can use whichever you prefer)
1 cup Heath bar bits (my "secret" ingredient)
Directions:
Preheat oven to 375ºF. Stir flour with baking soda and salt; set aside.
In large mixer bowl, cream butter with sugar and brown sugar. Add eggs one at a time and vanilla, fully incorporating after each addition.
Gradually blend dry mixture into creamed mixture. Stir in chocolate chips and Heath bar bits.
Drop 1 tablespoon of dough per cookie onto ungreased cookie sheets. I always line my cookie sheets with parchment paper and I use a small ice cream scooper to form the cookies to ensure they are all the same size.
Bake at 375ºF for 9 to 11 minutes or until golden brown. I bake for approximately 9 1/2 minutes and they come out perfect everytime.
Allow to cool for 5-10 minutes on a cooling rack and then transfer to an air tight container or ziplock bag so the cookies stay fresh and chewy.

Peanut butter and chocolate...Does it get any better?
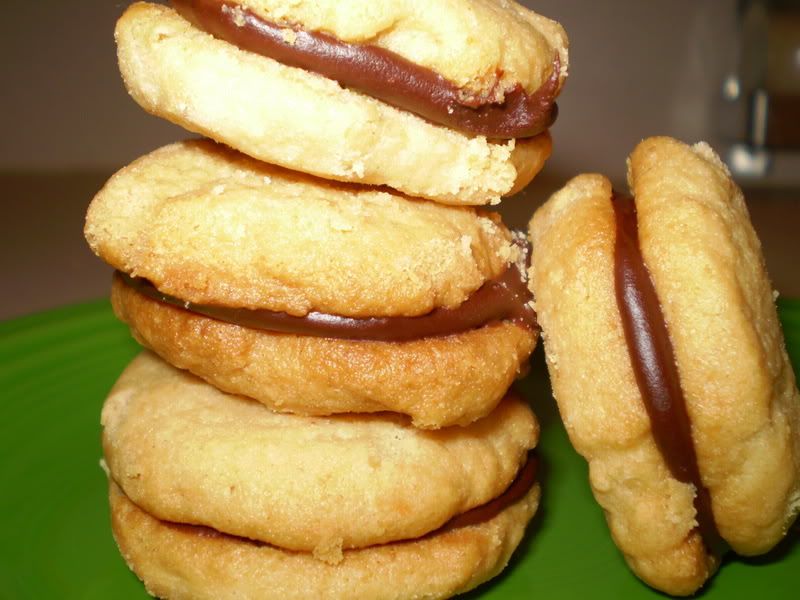
For Christmas, my husband ordered me several subscriptions to cooking magazines. One of my favorites is the Everday Food magazine from Martha Stewart. I found this recipe in the June 2008 issue. These cookies were a nice little treat, very creamy texture and they store well in an air tight container.
Chocolate Peanut-Butter Sandwich Cookies (Everyday Food June 2008 - Yield 15)
Ingredients:
1 cup all-purpose flour (spooned and leveled)
1/4 teaspoon baking soda
1/4 teaspoon salt
4 ounces semisweet chocolate, chopped
2 tablespoons heavy cream
1/2 cup (1 stick) unsalted butter, room temperature
1/3 cup creamy peanut butter
1/3 cup packed light-brown sugar
Directions:
Preheat oven to 350 degrees, with racks in upper and lower thirds. In a medium bowl, whisk together flour, baking soda, and salt; set aside.
Make filling: Place chocolate in a medium heatproof bowl set over (not in) a saucepan of simmering water; stir frequently until almost melted. Remove from heat; stir until completely melted. Stir in cream; set aside to cool and thicken, about 30 minutes.
Meanwhile, using an electric mixer on high speed, beat butter, peanut butter, and sugar in a large bowl until light and fluffy. Reduce speed to low; add flour mixture, and mix just until blended (do not overmix).
Drop dough by heaping teaspoons onto two baking sheets, about 1 1/2 inches apart. With the bottom of a damp glass, lightly flatten each mound of dough into a 2-inch round. Bake until golden around edges, 12 to 14 minutes, rotating sheets halfway through. Transfer cookies immediately to a wire rack to cool completely.
With a small offset spatula or table knife, spread bottom of half the cookies with 2 teaspoons filling each; sandwich with remaining cookies, pressing gently to spread filling to the edge. Let set for 15 minutes before serving.
Thursday, June 5, 2008
I'm such a slacker.
There I go neglecting my food blog already. I have made some delicious meals since starting this blog last week, I just haven't gotten around to downloading the pictures I took and posting them yet. I plan to do that this weekend, hopefully.

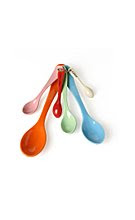
In the meantime, I thought I would post some pictures from my kitchen. I'm one of those crazy people that's obsessed with Fiestaware dishes. I have so many pieces that I am afraid one day I will come home from work to find all my kitchen cabinets have fallen off the walls due to the weight of the dishes inside. My poor husband begs me not to buy any more, but it's not my fault that the Homer Laughlin China company keeps making new colors...blame them, not me.
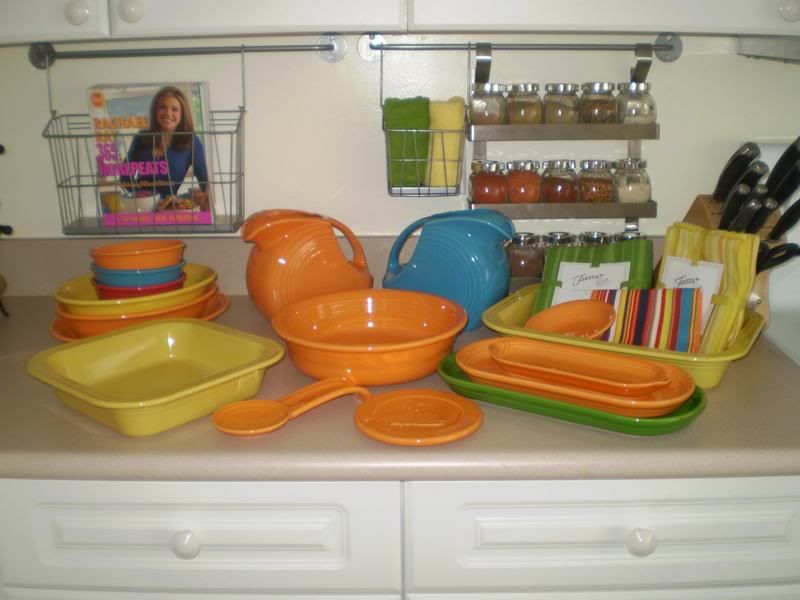
These are some of the newest things I have purchased. My mom and I take a trip out to the Homer Laughlin factory in West Virginia once or twice a year, and this is the damage from our last trip back in the fall.
This is the state of one cabinet. Yeah, I think it looks like the bottom shelf is bowing a little too. Oops.
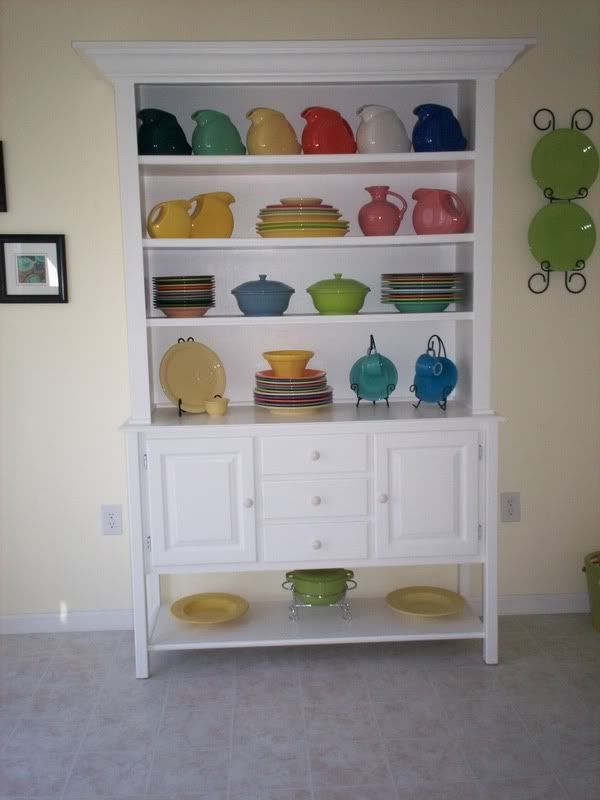
I also have a large buffet and hutch in the kitchen which houses many many many Fiesta dishes. The buffet table is from an unfinished wood furniture store and my mom helped me paint it white. The hutch on top of the buffet was hand made by my mom and dad...they did a great job!
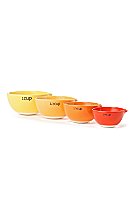
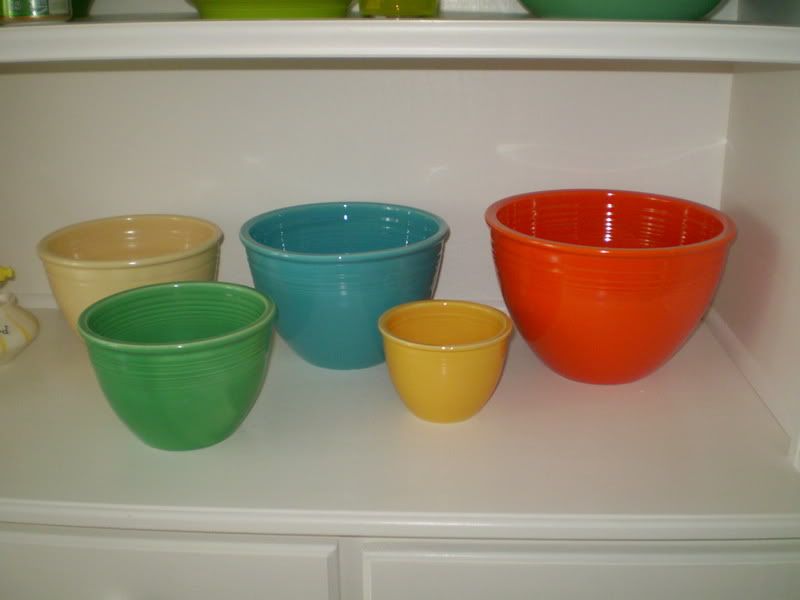
And since I am sure you are completely bored by now, this will be the last picture of my Fiestaware (for the time being). My latest Fiesta obsession...vintage nesting bowls. There are 7 in the set and currently I have 5... I still need the number 2 size, as well as the largest number 7 size. These bowls were manufactured from 1937 through 1944 and yes, the red is called "radioactive red" because they used low grade uranium to make the color glaze. What's the big deal, everyone needs a little radioactive uranium in their kitchen, right?!
Subscribe to:
Posts (Atom)